Thursday, January 21, 2016

OUGD405 - Studio Brief 02: Finished Leaflet


 These are the images of my final design printed out for the leaflet. I used the off white 200 gsm double sided stock to print my design onto as it gave the overall aesthetic more unusual and expensive look that bright white and really complimented the colours I had chosen to use.

The 200gsm stock was the perfect weight as it was robust enough to be folded and unfolded, numbers times without getting too worn or crumpled yet was thin enough to fold with easy creating crisp, clean lines between the different sections of information.

The matt stock also prevented the design looking cheap and unrefined like a takeaway menu and allowed finer details like the photograph of the puppies to not be distorted by reflecting light.


These are the final designs I made for my stickers. I created a two tone background for the '!' sticker to contrast with the colour on the corresponding page (orange with blue and blue with orange). I was keen to avoid introducing a third colour as I felt it would reduce the impact made by the first two images, therefore using this technique allowed both the contrast with the '!' and the impact of the front cover to remain high. The use of a symbol instead of writing also creates a sense of ambiguity that sparks the reader's interest.

However I was curious to see how a simple 'public information warning' sticker would work on the front cover as that may attract reader's attention in a more obvious sense. In this case using too many colours could cause confusion and reduce legibility so I stuck to a clean and simple light grey with the navy blue writing to contrast in Din Alternative Bold - the same font use don the inside. 


An image of the final stickers when printed and when applied to the leaflet. 

I was concerned that the stickers would rip the paper/ruin the print when peeled off however they did not and were just the right amount of sticky to hold the first two pages together as intended. 


Overal I am very pleased with the outcome of my design. I believe I have successfully created an eye-catching leaflet suitable for a large demographic of pet owners, particularly aimed at adults and young professionals between the ages of 20 - 60 years (the age that would be buying puppies/ transporting pets). 
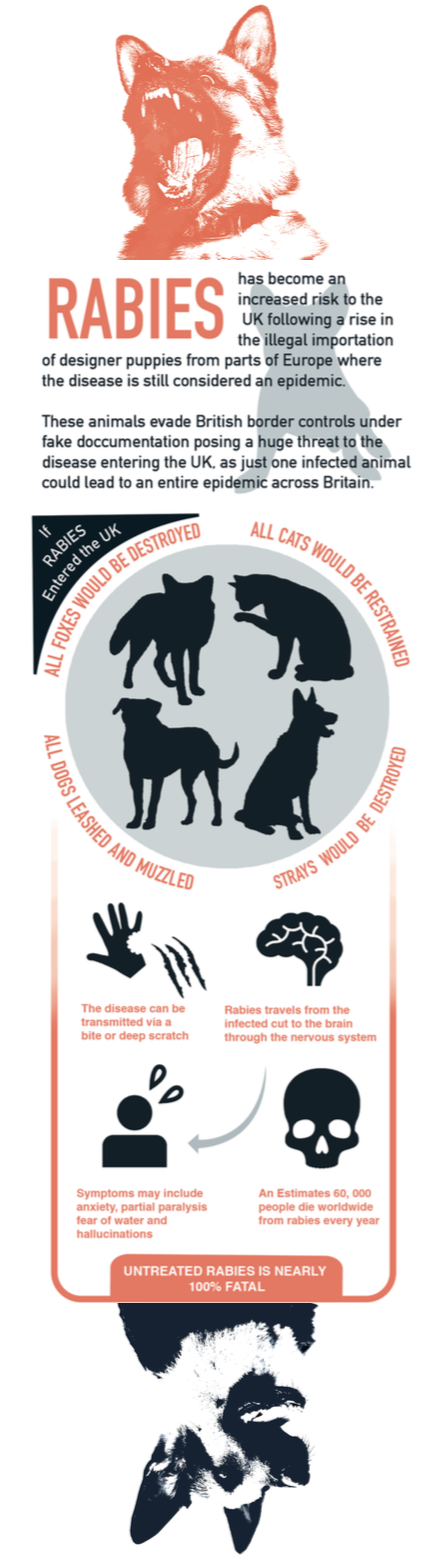

Summative Feedback: 

Are the colours I have chosen appropriate in the sense they are there to catch the readers attention, whilst simultaneously representing a threat of danger?


- Yes, effectively does the job. 


- Yeah deffo, its a serious set of colours, immediately setting a serious tone to the leaflet before opening it and reading the information. 


- The stock used helps make it look more imfortative than a bog standard white colour.


- Use of colour - navy colour - eye-catching and bold contrasted with orange - near enough red to show alarm / danger yet not predictable. Compliments the other colours use within the leaflet -work well as a trio . Can see design decisions were made. Use of three colours makes it more concise - overall impact - ties everything together. clear. Well designed.

- Doing a lot with minimal components to create maximum impact/effect. key to good design. less is more.

- Appeal to all demographics. Pick the most aesthetically pleasing -appeals to wide audience. 


Is the overall size of the leaflet big enough? 

- Exciting interactive fold/ sticker. Not bog standard doctors waiting room leaflet. Has substance.

- Better the design the better the information will stick.


- Yes - dimensions aren't a typical looking leaflet


- Unusual folds / overall design helps it stand out on a stand. 


- If it was bigger and had more information you wouldn't want to read it 


- Good size - right amount of -information -double sided helps this- good layout


- Can put it in pocket - fold it in different ways/ interchangeable once sticker is removed 

- Portable , not annoying , good sturdy paper - non tear - non floppy. 

Is there any information that you think I have missed off the leaflet that you would like to see? 


- Some people like taking part / action. A ' What can you do? ' section including information towards how the general public can contribute to the cause i.e.. charity / petition / donate to dogs trust contact details etc. 

- Bit repetitive with the comment on puppy smuggling quote - different statistic on the last time rabies was in the uk perhaps. 


Other Comments

- sleek & compact


- cool front cover


- simplified versions - small facts - makes you want to red it rather than loads of text. You read it instantly - makes you want to read it there and then rather than go back to it. 


- Use of one Typeface - easy to read, simple, italics, upper and lower case - multiple effects within one type. 

- All in one typeface- easier to digest -increases readability and continuity. 

- clear - bold

Wednesday, January 20, 2016

OUGD404 - Studio Brief 01 - How Do You Read? - Inspiration & Idea Development

For the overall style and look of the publication I found some inspiration to aid the development of the layout. I wanted to keep the book mainly typographic with only a few pictures as not to overcomplicate the booklet and to keep it clean and simple.

I wanted the text to be kept in narrow columns down the side of the book as I wanted to bind the spine in an interesting way. A recent bookbinding session provided 3 different types of bindings that could be suitable to put the publication together. The binding is more visible than using staples or glue and it adds a more personal, handmade feel to the publication. Alternatively I saw a number of publications online that have been bound with rubber bands. Once all the pages for the small publication are printed I will attempt using one of these binding methods. Here are some examples I found that I was interested in replicating:


Idea Development - As a starting point, an InDesign document was set up with facing A5 pages. It was important to make sure that the colour mode was in CMYK to ensure that the printed graphics would be as seen on screen and not RGB.
This is the grid I set up myself for the layout of my book:


In one of the study tasks we made a list of graphic design rules that should always be applied when designing and laying out a publication, including:

1) Keep Line Lengths Short - A 66-character line (counting both letters and spaces) is widely regarded as ideal and anything from 45 to 75 characters is satisfactory.
2) Have a consistent set of fonts- 2-3 fonts maximum.
3) Never over-stretch type
4) Use the correct alignment - Flush left is the most appropriate as we read from left to right and there are no rivers created. Justified can be used; however, only if the text has been typeset correctly to ensure that there are no rivers.
5) Use a grid - This creates a structured page, which leads to the aesthetic layout of the piece working well.

By designing a grid I have already ticked off one of the criteria. Next I need to choose, consistent, appropriate typefaces for optimum legibility.

Before this however; I did a quick rough sketch to show how I could lay out each page in the publication.


In terms of the typography I decided to use Avenir Next Condensed in Regular and Demi Bold and for the title of the book I used Hallo Euroboy, a font I downloaded from online. It has a thin, condensed appearance that I thought would tie in well with the overall look of the book as my collumns of text are long and thin also. For the body text, Avenir Next Condensed Regular was used at a size of 13.5pt. On average, this allowed each line length to be roughly 55-60 characters, which is very close to the ideal line length of 66 characters. This completes the firstrule. For the header size I followed Vignelli's points on type size relationships - 'We like to play off small type with larger type -usually twice as big (for instance, 10 pt text and 20 pt headings)'. For this reason, I used HalloEuroboy to create a bold title which was much larger than the body text. The use of only 2 typefaces also completed the second rule of having a consistent font pallet of 2-3 fonts maximum. Furthermore, the text was placed in a flush-left alignment to complete the fourth point on using the most appropriate alignment. The layouts Can be seen Below:


I then wanted a funny front cover for the book that would lighten the mood of the book and encourage new students to want to use grids rather than be afraid of them.

I went with 'I can't beleive it's not Gutter', because it's quite humorous and punny and then decided to draw an illustrtion of butter on the front replacing the word margarine with 'margains' and then write golden ratio on the side because that too haas buttery connotations.

This was the front cover design: 


Monday, January 18, 2016

OUGD405 - Studio Brief 02: Development

On the front cover of my design I wanted to have a healthy happy dog on one side and a rabid dog on the other. 

Sourcing a couple of images from the internet and editing them using photoshop gave the images a stylish stencil effect. This creates a more unusual and eye-catching look than simply using a photograph for the publication and also reduces printing costs by using a limited colour palette. 


These are the colour palettes I looked at and experimented with. the #ffffff will be replaced by the colour of the paper stock used. After a group crit everyone was in agreement that the most appropriate colour palette was the middle one as it was the most impacting. I made the rabid dog orange (#f93919) and the normal dog navy blue (#162231).


Once I was happy to use this as the front cover I began designing the infographics.

Layout I decided to lay the inside of leaflet out in this order:
  1. Information on puppy smuggling at the top to outline the relevance of the leaflet in today's society.
  2. Brief summary of what britain would be like if rabies became an epidemic. 
  3. Overview of the disease with symbols 
Typeface I wanted to use a clean, clear sans-serif typeface for the design of my leaflet as although it is argued that serif typefaces aid legibility when it comes to body text and smaller writing, it can sometimes look appear dated and too academic. Seeing as the public information video for rabies was so behind the times, making it seem an old and outdated concern, I wanted to give my leaflet a current and fresh revival through the use of a san-serif typeface seeing as the threat of rabies entering the UK is becoming much more relevant once again in light of recent events. 

I researched and experimented with a few sans-serif typefaces that I believed would be suitable for the design. 

Helvetica - An obvious choice to beging with, Helvetica is a universally recognised typeface which can be found pretty much anywhere in your day-to-day life. However as it was developed by Swiss typeface designer Max Miedinger in 1957 I wouldn't consider it particularly modern and therefore it contradicts the reasoning behind going for a sans-serif typeface. 

I looked at some more modern and unusual sans serif typefaces:


Din - In 1995, DIN was updated by Dutch designer Albert-Jan Pool and is known for its unrefinen, practical look. Din was originally created for it's use in engineering and technical applications such as traffic signs. The X-height is slightly taller than that of Helvetica making it appear longer.


Avenir - Released in 1988, Avenir is a geometric sans-serif typeface designed by legendary type designer Adrian Frutiger. It is known for it's slightly humanist features with it's imperfectly shaped 'o' and slight tail on the t. 


Brandon GrotesqueReleased in 2010, Brandon Grotesque is a geometric sans-serif typeface designed by German type designer Hannes von Döhren. It is inspired by the geometric typefaces of the 1920's. The features I like of this typeface include the decender on the g. There is also a text version available called Brandon Text that features a larger x-height, making it more suitable for body copy. 


Neutraface - A similar design to Brandon Grotesque, Neutraface is a geometric sans-serif typeface designed by Christian Schwartz and released through House Industries in 2002. It was inspired by the design principles of architect Richard Neutra. Fast food chain Wendy’s famously uses Neutraface in their advertising material. Neutraface has been an extremely popular typeface in the print world since its release.

As Brandon Grotesque and Neutraface we not free to download unfortunately I could not experiment with their typefaces in the design of my leaflet however I did experiment with Helvetica, Din and Avenir. 

Helvetica, Avenir, Din Alternate (in that order)
I decided to go with Din Alternate for the heading, subheadings and bodytext of the leaflet, to create coherence and simplicity. 

This is how it looked after the first attempt:


I used silhouettes of animals to represent the facts in the circle next to them, allowing readers to fill in the blanks if it were for their own pets and also symbolise a shadow or place left behind where these animals used to be. For the general facts on rabies at the bottom I used symbols from thenounproject.com to break up the writing allowing the reader to digest the information slowly and create further interest whilst reading the leaflet.

On the computer it looked good however after printing it out I realised there were some changes that needed to be made including spelling mistakes, colours and layout. I also wasn't particularly happy with the size of the publication once it was folded so went back to the drawing board to make some adjustments. 

The first thing I wanted to do was change the overall size of the leaflet so it looked bigger when printed. 

At the moment when unopened the dimensions of the leaflet were: 11.3 cm high x 8.8 cm wide. The ratio of these dimensions I felt were suitable however I wanted the leaflet to be no smaller than A6 when completely folded which is 14.8 cm high x 10.5 cm wide. Therefore I increased the diameters of my publication which in turn allowed me to fit more information into the space. 

Changing the orange colour from #f93919 to #ef5835 should hopefully improve the vibrance of the orange. 

Adding an 'if rabies entered the UK' header improves communication on what the middle header is listing.

Fading the border also made the lines less abrupt around the outside. 


The white background looked bit blank so I experimented by adding a subtle shape behind the text. I used the silhouette of a french bull dog puppy that I drew in illustrator as the background of the text, to engage the emotions of the reader, whilst perhaps making connections with pets they may own. 


This also draws parallels with the images used in the dogs trust report. I then began designing the back of the information leaflet. 

The content on the back would include: 

  • A quote from the Dog's trust regarding the issue.
  • An image relating to rabies
  • Helplines, numbers to call and contacts if anyone suspected an issue regarding rabies
  • I world map of where rabies was commonly found 
  • statistics. "The last reported case of rabies was...lets keep it that way." 
Advice: If you are concerned a puppy has been smuggled into the UK from abroad Contact your local authority or Trading Standards Office and make a report.


I added the french bulldog shapes to resonate with the look of the report on the dog's trust website as they too use bulldog's in the information on the puppy smuggling scandal. 

Once I was happy with the design I printed it off and stuck the two sides together to ensure they matched up and to have a quick overview of the entire leaflet, making adjustments where I thougt aspects could be improved / enhanced. 

The first thing that struck me once the leaflet was printed was that the orange/red colour was not as vibrant as I would have liked it to be. I went through the pantone colour charts to other inspiration for a more eycatching colour that I could use instead, that would brighten the aesthetic of the design and compliment the navy blue colour more. 

Pantone 15-1-5-U was the colour that stood out to me the most so I edited the leaflet so the red/orange would take on this more vibrant shade instead. 

Other Adjustments the leaflet needed: 


  • Make the french-bulldog behind the first set of text darker
  • The symbols illustrating the basic information on rabies needed to be made the same navy blue as the rest of the leaflet as they were still black.
  • Make the writing in the arrow for the 'you are here' on the map bigger. Barely legible. 
  • 'Dog's Trust 2014 report' - too slanted when italic - reduce slant. 
  • crop the image of the puppies so it doesn't spill over fold
  • Move Adrian Burder reference to underneath the quote. 
These were the final outcome of the two sides once these adjustments had been made: 


Using the same 4 colours, grey, orange, navy and off white creates a balanced composition within the leaflet, giving the design a professional, ordered and engaging look that people will want to read. 

The information is neatly split up into small, manageable chunks allowing the reader to digest the information quickly whilst simultaneously being fun and easy to read. 

The mix of pictograms, photographs, symbols and stencils also creates a balanced mix of interest within the leaflet and using different coloured backgrounds also helps to split up the details provided.  

After printing off a very rough copy of my leaflet I noticed that the pages did not stay together when folded. This would not be appropriate when being displayed in pet shops and veterinary surgeries as it could easily get damaged, crumpled and bent if it was flopping open. It would also take up more room on a stand and not as many leaflets would be able to be packed in. For this reason I decided to make a sticker to hold the front together before reading the leaflet. 

These are a few potential designs I sketched out: 


The stickers would follow the same colour scheme as the leaflet: orange, blue, grey and white. Some of the designs I decided were a bit excessive such as the toxic / radioactive symbols and the skull and crossbones and decided they would not be appropriate for the tone of my leaflet. 

Therefore I decided to develop the '!' and 'Public information warning' stickers further using illustrator and the college's sticker printer. 


I then took all of my designs to be printed properly on the stock that I had previously picked out. 


OUGD405 - Studio Brief 02: Stock

Having decided to go with my first design ( a double gate fold leaflet) I stated to consider the different elements that my leaflet would consist of to make it successful. 


Stock - The type of paper the leaflet will be made of is a key element of the design and will determine how durable it is, and the overall feel and appearance of the design. These are the main requirements I wanted for my stock: 
  • Relatively thick & Durable - Doesn't lose shape when unfolded and read multiple times.
  • Natural white / Cream colour rather than bright white to compliment the other colours in the design. 
  • Matte, not shiny to avoid it looking like a takeaway menu.
I looked at the different paper stocks in the G.F Smith collection and analysed their properties to determine whether or not they would be suitable for my leaflet. 

Colorplan / 175 gsm / p99 : Matte, relatively thick but not sure how durable it would be when constantly folded and read. Colour 'Natural' is a bit yellow I feel the colour 'bright white' on the previous page would be more suitable. 

Colourplan / 270 gsm / p100 : Much thicker but may not be as appropriate. I think 250 gsm would be in the right region.

Strathmore Writing / Soft White / 236 / p163 : Thick matte stock - not sure if it would be too thick for the design of a leaflet, creases would need scoring to fold and the shape may come apart under the pressure of being folded. Colour is perfect - not too yellow.

Zen / Pure White / 150 / p168 : Matte stock - again quite thin - perhaps need something in the region of 190 - 200 ? Colour good. 

Accent Fresco / Gesso / 120 / p120 : Matte stock - unusual grainy texture - would it be suitable for printing small type and detailed infographics? Colour good. 

Wild / White / 150 / p255 : Matte stock - more grainy texture - good thickness but still might be a tad thin. 

Takeo Pachia / White / 233 / p351 : Matte appearance / smooth texture - good thickness however goes quite fluffy around the edges. Might not be very durable over a longer amount of use. 

I'm going to order them from the G.F Smith 'The Collection' Website to get a more thorough idea of the paper qualities and test how easy they would be to fold. 


Wednesday, January 13, 2016

OUGD404 - Studio Brief 01 - How Do You Read? - Grids Research & Content

Research - To begin formulating the research for my book I read through 'Graphic Design The New Basics' By Ellen Lupton and Jennifer Cole, and also '100 Ideas that changed Graphic Design' By Steven Heller & Veronique Vienne. Both books contain a lot of information about Grids.

Content - By using the books and a few other online sources I was able to collect together the content for the small publication. As it is not meant to be a large publication, I rewrote and condensed the found information so that it would fit onto a fairly small-sized page. The following headers and content for each page are as follows:

Introduction

Many young designers starting out can find grids confusing. This short guide simply
explains the purpose of the Grid and why they are used in design.

Grids are like the invisible glue that holds a design together, so whether you work in print or on the web you need to understand grid theory. Grids are a widely debated area of Graphic Design with some designers loving them for the order and clarity they bring while others hate them for purportedly locking designers into rigid confines.

The truth behind Grids lies somewhere in between the two opinions. Swiss Designer Josef Müeller-Brockmann, author of Grid Systems in Graphic Design (1961), warned: ‘The Grid system is an aid, not a guarantee. It permits a number of possible uses and each designer can look for a solution appropriate to his personal style.’

Grids simply help to organise and space things out and create balance.
When Designing for a series which may include books, posters and leaflets, using a grid can help create continuity, lining elements up with the same visual rhythm across the project.

Grids Establish a Meter and Rythm

The main purpose of Grids in Graphic Design is establishing a set of guidelines, which elements can be positioned onto within a layout. Not only does an effective grid provide the rhythm for a design, but it also defines the meter.

Rhythm and Meter are important in a layout as they help to make the content more accessible to the reader, allowing the viewer to easily find the next piece of information within the layout.

In essence a grid is like a road-map along which the viewer’s eye travels.

Grids Design and Reflect Proportion

A key function of the grid is its ability to help determine and define proportion. In print, proportions most commonly echo the size of the media; the shape and orientation of the paper are often reflected in the size and shape of images and text included within their layout.

Grids Provide a Foundation and Balance

As we’ve established, grids exist primarily to help determine the position and balance for a layout. This can be used to help ensure that content is presented in an easy-to-understand order, but conversely by providing a firm foundation a grid can also be used to highlight specific areas of content simply by breaking elements outside the grid. The viewer will naturally identify these break-outs and be drawn towards them, giving the designer the opportunity to play with the hierarchy of a layout and tweak the semantic meaning of a piece of work.

Artists that thrive working with a Grid include designer Matt Wiley. He has redesigned the grid systems for many well established publications such as the independent and The New York Times Magazine.

His designs push the boundaries of the Grid System, which makes his work so easily
recognisable and iconic.

Alternatively, designers who loath the grid include designers such as David Carson.

What A Grid Looks Like


Nine Square Grid by John P. Corrigan, MFA Studio 

What a grid consists of


Who uses Grids?
Matt Wiley


Who doesn't use Grids?


Monday, January 11, 2016

OUGD404 - Studio Brief 01 - How Do you Read? - Brief and Reponse

After completing a number of Study tasks in this module focussing on a range of design principles essential to graphic design including colour theory, frame & format, type & grid, i have been provided with some basic knowledge of editorial and publication design skills that I must now use to create a small publication.

Brief - Design and produced a small publication explaining a key design principles to a reader. The design of the pages must be informed by the principles we have learnt in the study tasks.

As a starting point I have chosen a topic that I myself have been confused by as a young designer: Grids. Before starting on the course I had never heard of Grids before or used them in my work so I didn't fully understand them. I wanted to create a small booklet for young designers to simplify the use of grids and why they can be helpful. Some of the things that will be covered in the small publication include:

• What is a grid?
• Where can they be used?
• Who are they used by?

Sunday, January 10, 2016

OUGD405 - Studio Brief 02: Initial Ideas

After determining the content for my information leaflet on rabies entering the UK and gathering a bank of inspiration I was able to start sketching down some initial ideas for my publication. 

These were the key elements I wanted my design to include:

  • Displaying facts and figures as infographics
  • Limited colour palette. Perhaps: orange, black/navy, and white to add impact and make leaflet look less like junkmail
  • Tone of voice: serious, engaging, straightforward
  • Attatch a beloved animal figure / pet so people can relate
  • Think about the distribution of the leaflet. Flyers through the post can look like junk, ways to avoid this issue is enclose it in an envolope, creating an unusual colour scheme or changing the paper stock, distributing it in pet shops rather than through the post. 
Developmental sketches of a few potential ideas for the leaflet. I also sketched the potential for a bus stop advertisement to show how the campaign could be extended. 


The first leaflet I sketched out featured a double gate fold design that folds outwards with a mirror image of the same dog on the front: one with rabies, one without. The shocking image would catch a pet owners attention in a pet shop amongst other leaflets, or the attention of a homeowner if it was posted through their door. You would then pull apart the first two front pages to reveal the word rabies, surrounded by infographics on the inside, showing information on how to prevent rabies entering the UK, what the UK would be like if rabies became an epidemic here and other information general about the virus.

The back of the leaflet contains all the information you need to report any suspicious activity you think may be related to illegal puppy smuggling or the virus itself and sources from where I gathered the information. 

The stock of the information leaflet would be relatively thick and matte rather than glossy, as to differentiate it from junk mail so it wouldn't be thrown out straight away. This will increase the cost of production however it would mean there is no need to use an envelope, reducing costs in that aspect. 


The second design uses a different format: a 6 page accordion spread with the mouth and nose of a rabid dog on the front cover. The opening of the mouth is cut out to revealing a bright orange background. The cut out aspect was inspired by the designs for LCA's brochures in my previous blog post. On the following page will be the word Rabies.  The information will then be split into relevant subsections and printed on separate pages as to increase clarity and allow the reader to digest the information. 

The issue with this design is that having a cut out section where the mouth is loses space in the publication where information could be printed, and this is one aspect I will have to consider before choosing which design to take further.


Another design was a 12 page leaflet consisting entirely of infographics such as which countries are currently effected with rabies, the amount of deaths caused by rabies a year, what would happen in the UK if rabies became an epidemic and how rabies could get to the UK. I feel this design is not as relevant as the other as it focusses too much on irrelevant information considering the current threat of rabies to the UK. Facts like the puppy smuggling scandal should be prioritised over information such as what to do if you contract the disease etc. 


This is sketch of a possible extension to my campaign: a bus shelter advertisement. It too would show infographics of the information using vinyl stickers on a clear glass background. 

The most effective leaflets from my research used a limited colour palette of a maximum of 4 complimentary colours and this is an aspect I wanted to encompass in my own design. 

Even thought these are not public information videos, the way they use a limited colour palette in their designs creates huge visual impact and looks really effective.

The burnt orange, cream and black colour palette would be suitable for my own leaflet as I feel the colour orange resonates with danger without being too gaudy and over used. These two designs are both printed on a more off white/ cream looking stock as well which is another element I want to incorporate into my publication. 


Left: Other Studio's design for Studio Theatre's rebrand  RightNatalya Balnova / Silk screened book design

Feedback: in my group crit I received some helpful feedback on the design of my leaflet. Everyone agreed that the content of information I had chosen was appropriate and focussed on the right aspects of the subject, instead of areas such as 'what to do if you contract rabies?' etc. Everyone also agreed that they liked the first design the best as the cover was interesting but you didn't lose any space from the publication by cutting a hole out for the mouth [like in the second design]. They also agreed that using a limited colour palette creating a screen printed style effect was also a good idea. One point people said is that the leaflets should be distributed in Veterinary surgeries and pet shops rather than being posted through the mail as this would save production costs and also target a more relevant audience as not everyone owns a pet. This is a helpful point as now I can start designing the leaflet with that in mind rather than potentially trying to incorporate somewhere to put people's home addresses onto the design. With all this in mind I can start to take the design on my leaflet further. 

Development

Inspired by Other studio's design for Studio Theatre's rebrand I began by choosing a colour scheme for my leaflet using just black, orange and the colour of the paper stock, to reduce printing costs and also increase visual impact. 

The bright burnt orange colour is a more modern approach than red for indicating a warning and is also reminiscent of the colours used for cartoon foxes - one of the main animals that would be at risk if rabies entered the UK.  

Other examples of Graphic Design that use a colour palette:


Magazine by Iggy Wu 


Extensive branding for 99U Conference by Raewyn Brandon and Jocelyn K. Glei.

Robi Jõeleht AKA Robjoe - Interseting example of how typography can be presented in alternative ways alternative to just on a straight line.


Design for GDFB Catalogue 2010 by Rob van Hoesel - Also a good example of hold paper folding can add another element of interest to a design.